Thursday, December 27, 2012

Pouch-athon for Christmas


One of my favorite gifts to make for friends and family are zippered pouches. They are fast, easy, and you can use fun fabrics from your stash.

When we got in The Berenstain Bears fabric and I saw this math bolt I knew exactly what I could use it for, teacher gifts! I used this fantastic tutorial (my new favorite go to pouch tutorial), Moda's Lined Paper for the front, a few of my wool pennies and a vintage button for a decorative touch.

I tweeted my teacher gifts with an instagram picture the other day and The Berenstain Bears tweeted back that they liked it. It was a thrill to hear from them!


I embellished this pouch with some wool pennies and more vintage buttons.


I made several of these first aid pouches for family members. I had visions of them taking them on camping trips. I embroidered 'first aid' on the bottom and used a handy Frixon pen (the ink disappears with iron heat) to draw on the letters and then embroidered over my lines.


I had a hard time coming up with ideas for younger guys and I found this great tutorial by Amazing Mae, a trinket keeper.  He can clip it to his backpack and keep treasures in it.


And finally, a kitty pouch. I was heavily inspired by this one here. It was so dang cute I had to make one.

Did you finish your Christmas sewing projects?

Free Image Hosting at www.picturetrail.com

Monday, December 24, 2012


Merry Christmas and Happy Holidays from all of us Barn Chicks here at The Quilt Barn! We hope your days are merry and bright. We'll be back this week sharing some of the gifts we have been working on and links to the tutorials.

Now that all my sewing gifts are done, I feel like sewing again!

Free Image Hosting at www.picturetrail.com

Friday, December 21, 2012

Chevron Tree Skirt


I was browsing through Pinterest and I saw a black and white chevron skirt and thought "I need to make a chevron Christmas tree skirt. Now!" Heather and I laid out the a yard or so of the fabric on the counter. Heather cut 12 triangles. The straight top edge was cut 13" wide.

I sewed all 12 triangles together leaving one seam open. I sandwiched the backing, batting, and top with spray baste. My trusty old cd was used to trace a circle in the center and then I trimmed the open seam and the circle.


12- 20" pieces of jumbo white ric rac were then sewn on the seams to hold my layers together and hide the fact that my chevrons didn't match up perfectly. I trimmed around all the edges.
I used a red pre-made moda binding to go around the edges of the tree skirt. I haven't added any ties yet but I am thinking of reusing a saved Moda twill tape that came wrapped around a layer cake.

Fabric used: Moda Half Moon Modern Chevron, 1.5 yards
                    White Jumbo Ric Rac 250 inches (almost 7 yards)
                     Bias tape 6 yards

Free Image Hosting at www.picturetrail.com

Thursday, December 20, 2012

Curly Scraf Yarn is in and Its on Sale!


We got in a shipment of the Marina and Spectra curly scarf yarn. There are lots of new colors to choose from and more of the colors you love. Its on sale for a short time too! The Marina is 5.99 (regularly 8.99) and the Spectra, the one with the fun pompoms, is 8.99 (reg 12.99).

We can make a custom listing for you in our etsy store if you cannot make it into the shop. Convo us there and we would be happy to set up a listing for you.

The picture above shows just a small sample of the colors we got it.

Free Image Hosting at www.picturetrail.com

Tuesday, December 18, 2012

Knitted Monster Babies


Our friend Trina knitted us a Mama monster and her twin babies. Squee. I want to take them home


 The pattern came from the book The Big Book of Knitted Monsters.  They are sitting in our yarn area watching over everything. Awesome job Trina!

Most of the gifts I am giving this year are handmade. All the gifts I needed to mail off are made and mailed. Now I just have to finish the gifts for people I can give to in person.  Some of the gifts aren't Quilt Barn related (and a secret until they are gifted)  so I may not be sharing them here. If you want to take a peek at what else I am working on you can find me on Instagram. I am tinyglutton. If you are a crafty instagrammer I want to see what you are working on too.

Free Image Hosting at www.picturetrail.com

Friday, December 14, 2012

Fabric Christmas Paper Dolls

 
Thanks to my newest best friend, Pinterest, I found this lovely pin and a new "have to make this instant" project. I love those kinds. I also like finding new blogs to add to my reader.


The fabric is Christmas Paper Dolls by Windham. One bolt is the dolls and another is their clothing. I used a double sided fusible and fused the paper doll and a peppermint backing together (wrong sides together) and then cut them out. Same for her clothing.

My girls can play dress up with the paperdolls just like paper paper dolls but they will last forever.


And yes I copied Girl Inspired's pointsettia pouch. It is the perfect carry all for the dolls and their clothing.

You can find the paper doll fabrics and their coordinates here

I have the new Nancy Drew fabric on my brain next. We have in in and I am struggling what to make with it. Anyone have a good pattern idea for it?
 

Thursday, December 13, 2012

Grinch Christmas Quilt with Mini Pattern


I realized I haven't shown you the other Christmas window, it's The Grich.

The iron bed got a new Grinch quilt made for it and I layered it over a Moda red and white polka dot quilt. I wove a pine garland through the head board and hung a large lighted wreath from the top. A gold and red "G" was placed in the middle.

I found the Grinchy green stockings at The Dollar Store. My vintage tinsel tree and tinfoil garland sit near by.  The red star on top is also from The Dollar Store.


This was a really easy quilt and it came together fast. Amy liked it so she made 6. Seriously. That girl.


I had enough leftovers I made a pillow to go with the quilt. More Grinchy green was added with jumbo ricrac.


Amy quilted an all over Christmas ornament pattern and it looks fab. Thanks Amy.


Merry Grinchmas!!

If you want to make your own Grinch quilt here is what you will need:

-2 Grinch panels, 20 rectangles total (this will be a 4 block by 5 block with small inner and larger out border quilt)
-black inner border 6-2" strips
-outer border 7-6" strips
-block sashing 10 different fabrics 3-2.5" strips each
-backing: I used a directional Grinch fabric so I cut 2.5 yards and pieced the whole width vertical with a solid from my sash to round out the width
-binding 7-2.5" strips

  Cut our your blocks on the block outlines. Add a 2.5" strip to the side and sew using a 1/4" seam. Iron open and trim. Add the trimmed piece to the other side, iron open, and trim. Repeat for the top and bottom.
 Repeat for all 20 blocks. If my block had mostly red I used a green sashing and vice versa.
 Lay out your blocks in a 4X5 alternating green-red pattern. Rearrange to your liking and sew the rows together and then join the rows.
 Add your small inner black border then the larger outer border. Tada, you are done.

And that is my mini pattern.

Finished quilt size 56X84 You can find Grinch fabric here


Free Image Hosting at www.picturetrail.com

Wednesday, December 12, 2012

Polka Dot Tree Skirt Tutorial


 This tree skirt came from my ponderings about that box of 200 wool pennies.  I ended making a pillow with the pennies but I really wanted to make a tree skirt with this red Half Moon Modern big dots. Hmmm, what else could I put in those circles to jazz it up? Yoyos of course! 

What you need:
42"  of top
42" of backing (or to fit with the skirt top)
batting piece to fit
small Clover yoyo maker and scraps to make the yoyos 
buttons
bias binding, I used a premade Moda green with tiny white dot binding, approx 5 yards
ribbon for ties

What you do:

-make your yoys according to the Clover directions, or by your own method. I made about 15 but you can make more and fill in every circle.

-cut your top fabric into a circle. This pin on my Pinterest board gives a good diagram of how to cut a circle (the pin does not go back to a source so if anyone knows the original source let me know and I will credit it)
-trace an old cd in the middle of your circle for the tree base and draw another line down when your slit will be. You can cut it out later. 
-baste your top, batting and backing. I used bent safety pins in the red space. You could also use 505 Basting Spray.
-attach your yoys and buttons going through all three layers. This will be your "quilting". Be aware of your circle and slit markings and don't put yoys or buttons there.

-trim you batting and batting using the circle top as the guide. Cut the slit and middle circle along your markings
- attach your bias binding
-mark 3 places along your slit and sew on the ribbon lengths to the underside of your skirt in the binding ditch for your ties so you can tie your skirt closed. The length you cut will depend on the type and width of ribbon you buy


In the first picture I put the skirt on top of my repurposed circle table cloth.
This is my last wool project. I still have a box of those pennies so I am off to Pinterest to find more projects. Do you have any ideas?

Tuesday, December 11, 2012

Wool Penny Headband Tutorial


I have another wool penny tutorial for you today. If you are just joining us I have a box of 200 1 and 1.5" wool pennies that I am seeing how many things I can make.  You can see past projects here and here.

Today I am sharing my Penny Headband.

You need:
2  squares of wool (this is the base for the pennies) about 4X4
4 1.5" and 4 1" wool pennies
4 buttons
perle cotton
headband
hot glue

Steps:
-lay out your stacked pennies and buttons on your table to get a pleasing layout.
-sew your first penny stack and the button on your square base with the perle cotton (I use perle cotton for it's strength). Continue with the other 3 stacks
-trim the wool backing around the wool pennies leaving just a smidge showing from the front.
-cut your second piece of wool the same shape as your just trimmed topper
-hot glue the bottom piece to the underside of the headband off to the side of you headband (trace a bead along the underside of the headband)
-drizzle hot glue over the base of the top of this base and attach your topper


I wanted to share another headband I made. I made this one out of an old green measuring tape using a tutorial from our friend Emily at The Freckled Fox. I have a stash of colored measuring tapes and I will be making more of these. Love em.

Free Image Hosting at www.picturetrail.com

Monday, December 10, 2012

12 Days of Christmas Advent Calendar


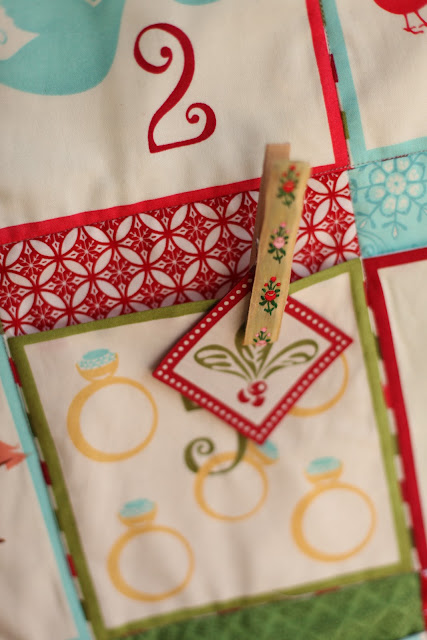
Back in November I noticed that we had some older Christmas fabrics left including Kate Spain's 12 Days of Christmas. These colors are more my Christmas color style so I came up with a project for it.
Instead of making a full 24 day advent calendar I thought about a calendar that could count down the 12 days before. Less pockets to fill and my kids wouldn't lose interest as fast (or so I am imagining).
I used this tutorial as the inspiration to make the pockets, minus the sashing. It was a quick project and I like that the pockets are are bigger than some other advent calendars.


To keep track of what day we are on I fussy cut one of the tags that come with the panel and fused it using double sided fusible to a scrap from the pockets. A clothes peg with a hot glued a piece of ribbon holds it on.

And....
The winner of our Sew Mama Sew Giveaway day is Desi. She said "I am hoping to get stockings sewn, a quilt top pieced together, a doll sewn for my daughter, and a gift made for my husband as well. Wow-- just realized how truly much that is!" That's awesome Desi, you can do it!
I've emailed you Desi.

And the winner of our Wool Penny Pincushion Kit is Kathy Sue (I snuck in this giveaway at the end of the pincushion tutorial). Kathy Sue, email me your address so I can get your package off to you, info@thequiltbarn.com

Thanks to all of you who played along with us.

Free Image Hosting at www.picturetrail.com

Friday, December 7, 2012

Wool Penny Pincushion Tutorial


I have another project using my favorite new  Quilt Barn item, a box of 200 wool pennies in 1" and 1.5" circles.  You can see yesterday's wool penny project here.

 
The box of yummy bright wool pennies.


This pincushion was inspired by the pattern Wool Pincushions 1 by Cottage Creek Quilts.

Here is what you will need:
5" square of black wool for the top
5" square for the bottom
9- 1.5" wool pennies
9- 1 wool pennies
perle cotton and a needle
filler (I use crushed walnut shells found at a pet stop and a bit of stuffing)

Here is what you do:
Pincushion Top
-lay out your pennies in a 9 by 9 square (like in the picture above) with the smaller pennies on top and move them around until you get a layout you like
-start in the left top corner and grab the first penny stack and attach to your black wool square with the perle cotton. Come up from the back through the middle of the penny and then back down. Do not tie off.
-grab your next stack of pennies and attach with your length of perle cotton
- continue on attaching your pennies in your 9 by 9 grid with a continuous length of perle cotton.

Attaching the Top and Bottom
-with right sides together of the black wool top and your bottom piece sew around the edges with a 1/4 inch sew allowance. Leave 3 inches in the middle of one side open for turning.
-turn out your pincushion and fill with your choice of filling. I fill mine 90% full with the walnut shells and then place a wad of stuffing at the hole to keep the shells from falling out while I hand stitch the opening closed.


 The cute sewing machine pincushion is made with my inspiration pattern, Wool Pincushions I, by Cottage Creek Quilts. Both of these were made with one (each black and tan) 10"X10" cut of wool. We have new stacks of wool 10 by 10 squares that I wanted to play with.

If you have stuck around long enough through this post I have a Wool Penny kit to giveaway to one of you. You get 9- 1", 9- 1.5" wool pennies, one 5" square of black wool,  one 5" square of backing/bottom fabric, and a length of perle cotton
This giveaway if a thank you to our awesome followers. Leave a comment before Sunday 12AM letting us know you are a follower and if you will be sewing this weekend.

Thursday, December 6, 2012

Wool Pennies and Half Moon Pillow Tutorial


First, don't forgot about our big Sew Mama Sew Giveaway. You have until Decemeber 7 5 PM to enter.

Now on to a quick pillow project. I have been eyeing these boxes of pre-cut wool pennies for a few weeks wondering what to do with them. They are so bright and fun. Enter Moda's Half Moon Modern fabric in Aqua. Light bulb moment! The white circles on the fabric are a huge 2 and a smidge inches so my 1.5 inch wool penny fit perfectly. Place a smaller 1" penny on top and perfection.

You will need:
pillow insert, size of your choice
a front and back piece of fabric one inch bigger around than the size of your pillow
1.5 and 1" pennies, enough to cover the circles of your fabric
spray baste
batting scrap the size of the front of your pillow

 
 Here is how I made it:

-Cut your top, backing fabric, and batting scrap one inch bigger around than your pillow (you will have a 1/2 seam allowance)
-spray baste the batting to your top fabric
-start in the middle of the fabric, pick a circle and place a 1.5" and top with a 1" penny. Stick a quick, short back and forth to secure the pennies.
-my machine has a cut thread button so I cut my thread in between pennies but you could cut your threads after the pennies have been attached
-continue across the pillow attaching pennies in every circle. I left the edge half circles empty.
-place the back piece on top of the front piece right sides together and sew with a half in seam allowance. Leave an opening big enough to insert your pillow. After inserting the pillow close the opening with a whip stitch.

Voila, one cute pillow and it hardly any time. I have a bunch of the pennies left so I am seeing what else I can make with them. I have some fun things up my sleeve and I will share them this week.  

I am linking up to Finish it up Friday over at Crazy Mom Quilts. Pop over and see her crazy cute bag she finished up this week
Free Image Hosting at www.picturetrail.com

Monday, December 3, 2012

Sew Mama Sew Giveaway Day!


Welcome to the Sew mam Sew Giveaway Day! This is our third go around and we have a great time reading all your comments. 

Here is what you win:

Moda Sweet draw string bag
Joy charm pack
Moda Safety pin zipper pouch
Quilty Notebook
Westminster Girlie charm pack
Here is how it works:


-a comment will be picked at random on December 7 and we will contact you via email and on the blog. If you are a no comment reader leave a way for us to contact you in your comment.

-you have one week after we contact you to get back to us. After that we will randomly draw another name.

-leave a comment telling us what, if anything, you are sewing for Christmas

-if you are a follower leave another comment telling us for a second entry

-we will ship anywhere


Check back this week for Christmas sewing tutorials! And good luck.

Be sure to check out the other giveaways at Sew mama Sew

Thursday, November 29, 2012

Christms Window, Stockings


Getting a full view picture of our windows isn't easy but Laura managed to get a good shot of our Cozy Cabin window.

To start I hung a couple of red plaid table cloths from my thrift stash to create a festive backdrop. The church pew was centered and placed on a vintage handmade wool braided rug. I picked up two at our local Methodist Church spring rummage sale.

A rustic wood bench serves as our coffee table.  A sled, small trees and, and child's wicker chair round out the scene.

We knew we wanted a fireplace and making one out of cardboard fit our budget. I saved this huge piece of cardboard for several months waiting to make this project. I cut various rock shapes and glued them on to the front of the fireplace with hot glue.
 The base got a coat of cream the the rocks got a swirl of grey paint with a foam brush. I only had to buy a small tester pot of the grey paint.
 I finished it off with a few flicks of grey paint from a brush to give the whole piece a flecked look. I leaned the front against the butcher's table that is permanently in our window and placed a few crates on top for height.
I slipped another crate partially in a cut out fire box added a hatchet and a chalkboard painted silver tray. If I had a few logs I would have stuck them up out of the box.  One $2.50 (for paint) fireplace, done.


Of course stockings have to be made for the fireplace. Laura was in charge of that and she picked out some great wintery brushed cottons for a vintage feel..


We hung a lighted garland across the top of the display and hung fun gold ornaments. The ornaments are from the dollar store. I also made and hung 4 large burlap and red fabric strip pompopms. Can you see them in the first picture? I used this tutorial from Cleverly Inspired.
Free Image Hosting at www.picturetrail.com

Wednesday, November 28, 2012

Star Wheel Quilt


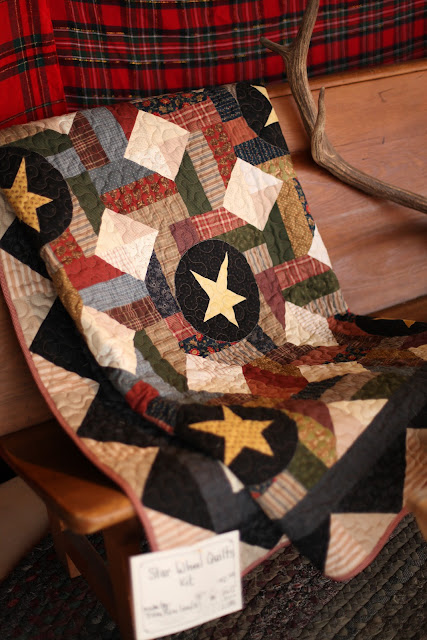
We like to feature a quilt in our themed windows and over in our Cozy Cabin window is the Star Wheel Quilt, perfect for snuggling under during those frosty nights.
We draped it over an old church pew and it shares it seat with a large pair of antlers.


Big thanks to our friend Trina, she knocked out our shop sample for us.  We have a few kits left. I put one in our etsy shop if you would like one too.


The circles and stars are raw edge and fusible applique. The pattern is from the book Scrap Quilts Go Country. Amy long arm quilted an all over stipple design.  Amy does a lot of local long arm quilting but we also receive quilts in the mail from all over. You can get more info here.

Free Image Hosting at www.picturetrail.com