Tuesday, December 9, 2014

What I'm Working On: Project Tote


I saw this pattern by Jodi of Vintage Ric Rac and got started right away. I used unbleached linen for the exterior. To transfer the "Work in Progress" image I taped the paper pattern to a window, laid the cut front piece on top, and traced with my handy Frixon Pen.

This bag came together fairly quickly. The inner handle bindings were a bit of a bear though. I have a few more of these cut out (great presents!) so hopefully I get a bit better with that binding.


The bag lining is a fun sewing machine fabric. A perfect pairing.

Tuesday, November 25, 2014

Figures Patchwork Quilt


Heather and I have a joke that we only want to make patchwork quilts from now on. We see a fabric line we line and want to patchwork it! Of course, that doesn't always work out but sometimes it does.
There is just something so satisfying about the simplicity of rows of squares.

This quilt was made by our friend, Erika, of Pink Suede Shoe (check her out on Instagram). She used a fat quarter bundle of Figures, by Zen Chic, and several other coordinating fabrics.

Heather quilted the figure 8's. Did you know you can mail in your quilt top and backing and Heather can quilt your quilt  and mail it back? So cool. Info on how to do that is here.


I think the backing is just as awesome as the front. Its like a reversible two for one quilt.

I added a few greens on the shelf to show that the navy goes with other colors too. Teal, red, tan...navy is the perfect compliment to so many colors.

You many have noticed there is no binding on the quilt. Yet. I have to admit, for me, sewing the binding on can really delay a project. Why is that? So close!

Monday, November 24, 2014

The Quilt Barn will be closed this week of Thanksgiving.  We will re-open again on Tuesday, December 2nd.  If you need to pick up a quilt, please call Heather at 208-420-3484.

Thanks!

Thursday, November 20, 2014

Vintage Quilt Thursday: 6 Pointed Star


Welcome to another Vintage Quilt Thursday. Today is a continuation of my previous posts on the 6 Pointed Star quilt (you can see here and here) .

These 2 vintage quilts show another way to lay out your paper pieced stars.


Welcome to another Vintage Quilt Thursday. Today is a continuation of my previous posts on the 6 Pointed Star quilt (you can see here and here) .

These 2 vintage quilts show another way to lay out your paper pieced stars.

 The amazing feedsack top above (source here)  is pieced with hexagons as well as the white diamond spacers! It reminds me of an Irish chain quilt.


This pink beauty (source here, and its for sale!!) is pieced with 2 sizes of squares.


Here is Heather's quilt, and the inspiration for the latest Vintage Quilt Tutorial, that was joined with the same diamond shape.

Lots of options out there for your 6 Pointed Star quilt.
You can find the papers to make your own 6 Pointed Star here .

I have started working on the next tutorial and am quite pleased so far (fingers crossed). I will share the inspiration pic next Thursday so come back for that!

Tuesday, November 18, 2014

Indigo Denim Baby Quilt


Check out the adorable baby quilt Heather made with Indigo by Moda. She cut mini jelly rolls and used the Jelly Roll Jam II pattern. It finishes at 36"X39".

She used double poly batting and a wide chevron quilting pattern for a puffy soft quilt.

Kits are available in our Etsy Shop and in store. And can you believe they are $24.99!

Tuesday, November 11, 2014

Modern Building Baby Quilt


I have something to awesome to show you today. Have you been following along with my Modern Building Block show and tell? This is one of the blocks from the pattern book. I haven't made this particular block yet. You get an idea of just how big these bigger blocks are.


Our friend, Ericka, of Pink Suede Shoe (same name on Instagram) pulled great fabrics and made this shop sample a few weeks ago. There are a a few different lines in here:
Far Far Away, Up Parasol, Quilter's Linen, April Showers, and dots.


Erika added an outer border and fussy cut corner blocks featuring the frogs from Far Far Away. And of course the binding is the best!


We made a few kits and it includes the pattern book, fabrics for the top, and the binding. Happy Sewing!

Tuesday, November 4, 2014

What I'm Working On


Hello, I am sharing what I worked on this weekend today. Heather got in some bolts of Fancy by Lily Ashbury last week and I got right to work pulling coordinating fabrics.  I cut out triangles and arranged them in rows.

At first, I had them all mixed together in the hexie rounds but I didn't think that worked. I placed them together to color coordinate and liked that much better.

I showed Heather this morning and she commented on the grey stars in the middle. What do you know, I didn't even see it.


I am hand sewing this one with chunky perle stitches. Hopefully it won't take too long.


Here is my inspiration, Fancy bolts.


And a shot of the fabrics I pulled to go with it. My backing is the 4th from the top, an Emmy Grace print. I have extra I could use for the binding but I am not sure if it is the best choice. I probably should use it, I don't need anymore scraps. Use it Up!

The grey is an Architextures print that we are out of but more is on its way. Its a great background. It is an extra wide backing print. I love extra wide backings. Often, the last thing I want to do when I have finished piecing a quilt is to piece a backing. So satisfying to cut a chunk of extra wide and be done with it.

I took a few photos during and will post a quick how to tutorial and a pdf of the triangle. I am hoping to finish the quilting this week so maybe next Tuesday.

Thursday, October 30, 2014

Vintage Quilt Tutorial: Paper Pieced Star


 Happy Thursday and welcome to another tutorial inspired by a vintage quilt. You can see the inspiration for today's tutorial here.

This tutorial is similar to another paper piecing tutorial (hexagons) and you can check it out here


For this block you will need 6 paper diamonds, 6 fabric rectangles (5"X2.5"), and either a glue pen or a needle and thread


Using the paper diamond as a template cut your rectangles leaving a generous 1/4" bigger than the paper. This will cut down on bulk.
Dot a bit of glue in the center of the paper and press to the wrong side of the fabric. This will help keep the paper from sliding around.


Glue basting method:
trace a line of glue down one side of the paper, fold the fabric over and press.


Do the same for all 4 sides. Voila.


Hand sewing method:
Fold over the fabric on the side point and stitch 2 small stitches through all fabric layers.
Go up to the top corner and do the same


I like to heat press my hand sewn diamonds.
Here are 5 hand sewn and 1 glue based diamond


Now to join the diamonds. Place 2 diamonds, right sides together, and sew a whip stitch from point to point. I like to start and stop each end with 2 stitches to add reinforcement.


Ta-da. Matching thread will help make the stitches less noticeable on the other side.


Here is the first unit


Continue adding diamonds the same way. Here is half of the star untit


Stitch the last side by  folding the unit in half and sew from the middle out.


We did it. You can fussy cut your fabric and create a nice spinning effect with the fabric.


After all the diamonds are sewn I iron the center points in a fan to reduce bulk.


You can make add the spacers in the same way as the star pieces. Sew from the outside point to the middle, make a few extra stitches int he center for reinforcement and back up the other side to the outer point.


All stitched up.


And the back.
Next time I will show you a few ways to join your stars and spacers. I will aslo be adding the Sewline glue pens to our Etsy shop if you want to give that a try too.

Monday, October 27, 2014

Reversible Tote


I started this awesome reversible tote over a month ago and never finished it. The instructions had me finish the raw edges around the handles by turning under the front and back edges and sewing them together. At the time I thought a bias binding would be easier. I should just follow the instructions.

The binding didn't work. I sewed around the edge thinking that would be ok. Hmmm... not so much. I should have followed the instructions. I think its a great tote and have been using it as a catch all on my sewing table and will probably leave it as is.


Here is a peek of the inside. I fussy cut the pocket with a fun sewing machine fabric.
This is a free pattern and I would recommend it. But follow the directions, lol.


Wednesday, October 22, 2014

Christmas Pillowcases


This sweet Christmas fabric by Alexander Henry has been calling my name. It's Santa's Village and Santa's Slippers.

This time of year many of us are making pillow cases to give as gifts and decorate our beds so what better (and seriously fast) project for this fabric.

I used Twiddletail's free Magic Burrito tutorial.

The stripe accent piece is from Moda's Winter Wonderland and the teeny aqua accent piece is a Moda Bella Solid (9900 132).

I made a few kits for the shop and the Etsy store.
You can find the fabrics here

Thursday, October 16, 2014

Vintage Quilt Thursday: 6 Pointed Star


 Happy Thursday! Today I am sharing a vintage quilt from Heather's collection. It is an english paper pieced 6 pointed star made with the most amazing variety of vintage feedsack fabrics.


Heather basted the quilt on her long arm machine and it hand quilting it.


Next week I am going to share a tutorial on making this block. You don't have to make a whole quilt like this one but a block or two would be fun to make into baby quilt, a pillow, or a pouch.


I think this pink block with the blue flowers is my favorite.
Be sure to come back next Thursday and check out our tutorial!! Happy Sewing.

Tuesday, October 14, 2014

Happy Birthday Quilty Fun!

Happy, Happy Birthday Quilty Fun!

We are so excited to join Lori Holt and Fat Quarter Shop to celebrate the 1 year birthday of Quilty Fun and share with you this adorable FREE Quilty Fun Birthday Block! 

Quilty Fun features Lori's incredibly popular Bee In My Bonnet Row-A-Long with 10 amazing projects to use around your home.  You can purchase your own copy HERE at the Fat Quarter Shop!
As I pulled fabrics for my Birthday Cake Mini Quilt, my 10 year old daughter wanted to join in the fun and make a block of her own.  We each made a stack and I decided I would sew them both at the same time - just for fun!  So often, we only show the best of our finished projects - so here's to keeping it real...

My Block:


Her Block:

I have been out color schemed by my 10 year old this time.  Her block wins - hands down!  So I'm offering a FREE Kit to make this adorable mini with every $50 order in our WebStore or ETSY store today only!  Thanks for blog hopping today - have a Quilty Fun Day!


Thursday, October 9, 2014

Vintage Quilt Thursday: Baby Bow Tie Tutorial


Welcome to another Vintage Quilt Thursday!! Today I am sharing a tutorial for a bow tie block.
You can check out the vintage inspiration here.

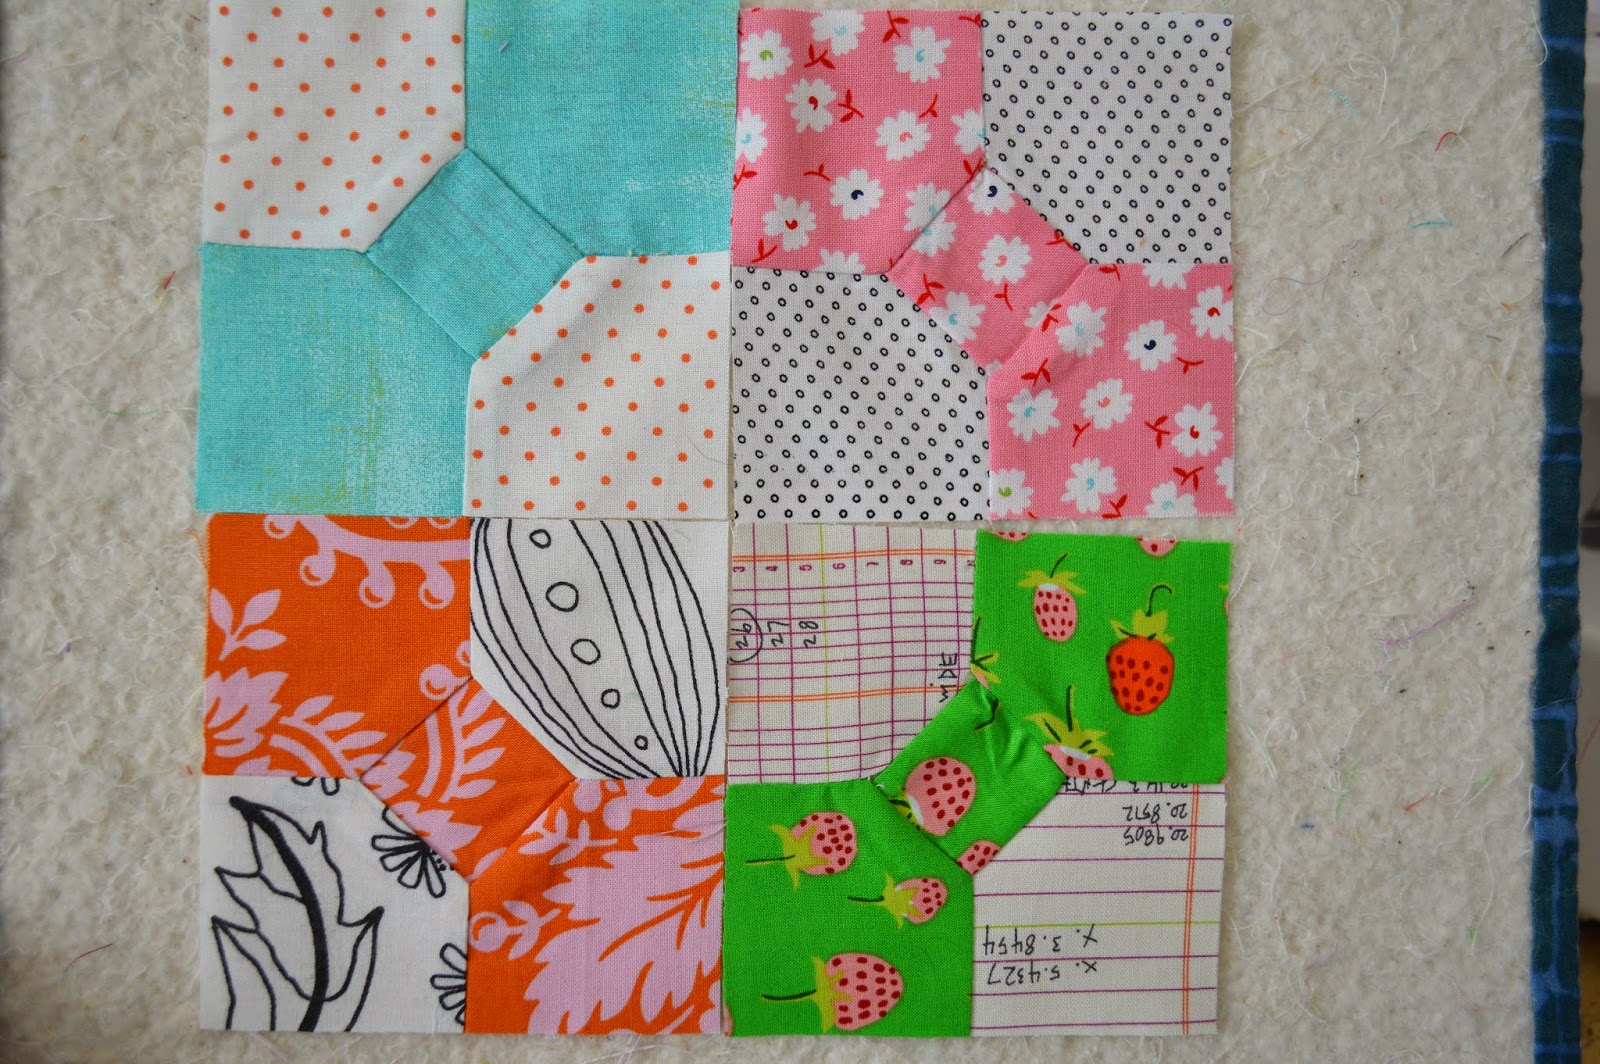
The picture above shows 4 of the blocks put together. Since I am not making a full quilt with the blocks I put 4 together to make one bigger block. This 4 unit block is 7.5" unfinished.

First, CLICK HERE to print out our template. It has 2 pieces, A and B, that you will use to cut our your pieces. You can use the cut paper to trace (that's what I did) or you can trace it on to heavier card stock.


You will need (per block):
1 B piece of bow tie fabric
2 A pieces of bow tie fabric
2 A pieces of background fabric

Trace and cut out these pieces using the printed and cut templates.


This block uses Y seams, or partial seams, so I marked a few of the pieces to help me know when to stop my seam.

One the middle square draw a line on each side 1/4" from the edge. Do the same for the background A pieces. I used a Frixon pen. The drawn line disappears with the heat of an iron.


First we are going to sew the middle bow tie. With right sides together sew the middle B square to the A piece.


Sew your seam just on the drawn line.


Do the same for the other middle square and A piece. Can you see my seam, how it doesn't go all the way from one edge to the other?
Iron your seams


Now for the background pieces. With right sides together lay your background piece on the middle square. Sew a line following the drawn line, starting and stopping before each end.


This step is hard to photograph and will make more sense when you get to this step and can see it in person.
Fold the bow tie unit to the side and line up the background outside edge with the bow tie edge.
Sew your seam from the point (at the edge of my thumb) to the outside edge.
I had to unpick a few seams at this step to get a feel for how far the seam should go to the middle. It doesn't have to be perfect, ironing will help it lay flat.


Sew your seam the same way on the other side of the same piece.
Repeat for your opposite A background block.


Iron and trim. This block is 4" unfinished.


Here is the back.


If you are putting blocks together, like I did, without sashing, there are a few ways to orient the blocks.
This way I create a colorful 4 patch in the middle.


And if I sew them this way I get a different look and all the bow ties go in the same direction.


The 4 patch method will also give you a 4 patch of background fabrics. This would make a fun ring effect with the bow ties.

So, clear as mud? This was a bit more challenging block if you haven't tackled Y seams before.

Check out this new fabric I listed in our Etsy shop. I love the low volume effect with pops of teal. And it has a doily so you know I love it. It is also in our webstore.

See you next time for another Vintage Quilt Thursday inspiration quilt. You can check out our past Vintage Quilt inspirations and tutorials by clicking on the link at the top of the blog.